Posted on

True Ames FIN TALK with Chuck Ames

Welcome to “Fin Talks” – a series of interviews with the most talented and respected surfer/shapers in our industry. In these interviews, we will explore a wide range of topics related to fin design, performance, and history. We hope you enjoy this series and the insight each discussion brings.

For our first edition, who better to sit down with than True Ames Owner and legendary craftsman, Chuck Ames. Beginning in 1979, Chuck has been fine tuning surf fins for the world’s best surfers across all disciplines. From classic noserider single fins to performance thrusters, each fin is precision foiled for optimal performance.

In our discussion with Chuck, we covered the importance of flex and how it plays a role in performance surfing. We also learned about the evolution of materials from the first fins Chuck foiled, to what is used today to create the industry’s best fins. Lastly, we looked at the history of the L-Flex and the collaboration between Greg Liddle and Chuck in designing the template.

Lets get into it…

TA: Why is flex important in fin design?

CA: Simply stated: flex allows one to make smooth transitions while in a turn. Flex allows the board to release and transition to the rail while maintaining speed and control…and even acceleration! A rigid fin can “spin out” when loaded up in a turn and will not have a smooth transition. Conversely and overly flexible fin will lose drive in the turn and will not produce the power needed to set up for the next turn.

Proper flex is dictated by the particular fin design. Many fins can benefit from flex!

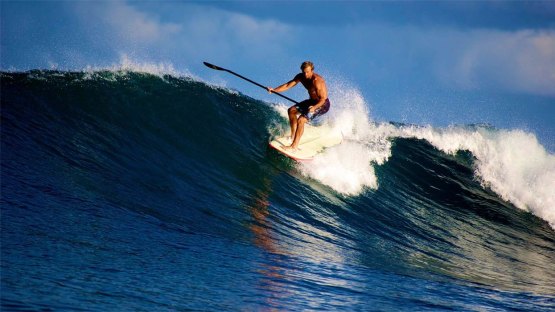
George Greenough at Honolua Bay. Shot by John Witzig, 1967 – retrieved from icecreamheadaches.nyc

TA: What type of fins benefit the most from more/less flex?

CA: The fins that benefit the most from flex are in the area of performance surfing! There are many shapes and sizes of fins from single fins to multi fin surfboards.

One of the most popular fins that benefit from flex (and a proper foil) is the Greenough 4A. This design originates with inspiration from a Tuna fish. These fish travel at high speeds and can make rapid direction changes. It is very evident that their fins flex from the mid-section to the tip. So we attempt to emulate this with our fins and especially with the 4A!

Narrow, high aspect ratio, fins must have just the right flex characteristics if they are to perform at a high level. These kinds of fins certainly benefit the most from “proper” flex.

A fuller area, pivot style fin, such as a Yater spoon does not depend on flex for it to perform well. Mostly because the kind of surfing typically done is not rail to rail.

TA: What about the L-flex? Can you elaborate on some of the history of that fin? How did you and Greg Liddle initially team up?

CA: A “Liddle ” about the L-Flex. The origin of the L-Flex is certainly with Greg Liddle and his “hull design” surf craft. But to go back a bit further one could point to the defining moment when Nat young won the world contest in 1966. Magic Sam was the name of his modified/shortened self shaped pig. The fin was not working too well, and just before the contest George Greenough actually took a bunch of area out of Nat’s fin and gave it “proper” flex. He went on to win that contest and some say that was the beginning of the shortboard revolution. The important takeaway is that Nat was riding a “hull” style board and a narrow fin with flex made this board come alive

Fast forward to 1979 when I first started to foil fins for Greg Liddle: Greg was one of my first customers and showed me how to properly foil one of his L-flex designs using heavy Volan fiberglass material. The fins were crude (by today’s standards) but the foil/flex/design were the driving factors to make his hull design surfboards come alive! There were so many templates! Each board design dictated a specific fin. These fins have become a timeless staple that most surfers have benefited from.

TA: Volan fins are known to be the highest quality fins on the market, how does Volan impact flex and performance characteristics?

CA: Volan fiberglass has been the material of choice for pure flex fins from the late 60’s . It is basically an industrial boat fabric. For some reason, (that has never been fully explained to me ), Volan exhibits great flex properties when used to make a fin using polyester resin (*). Volan fins flex further down into the body of the fin making for a nice evenly distributed flex. This is probably the most notable characteristic of the Volan fiberglass when used to make a flex fin. We also try to strategically “orient” the fiberglass weave to optimize flex/twist as well.

*fins made with common surfboard “E” glass tend to be stiffer in the middle of the body. They only have tip flex.

Posted on

True Ames Fin Talk  – Malcolm Campbell

What’s in a name?  Well, if the name is Campbell and we are talking surfboards, then half a century of design theory, innovation, and style.  Malcolm and Duncan Campbell have spent the last 50 years developing, riding, and refining some of the most uniquely functional surf craft ever made.

It started with an idea in 1970, and it has grown into a global movement that is hard to explain to those uninitiated to the Bonzer tribe. The Campbell Bros. and True Ames have worked together since the early days, so we thought it fitting to talk fins with Malcolm Campbell, and pick his brain as to how and why the Bonzer board and fin set up has worked so well for so long.

TA: For those who might not know, when did you begin collaborating with True Ames to manufacture Bonzer runners and center fins for your boards?

MC: We have been working with True Ames fins for over 4 decades. Beginning in the days when Chuck Ames was a solo act, to now – as one of the top fin companies on the planet. Chuck has always been an integral part of the Campbell Brothers Bonzer Experience.

TA: What was the catalyst that inspired the Bonzer design? What would you attribute its longevity to?

MC: The catalyst for our development of the Bonzer design was the Shortboard Revolution of the late 1960’s. Board lengths dropped drastically over a short period of time. Duncan and I were heavily influenced by what was going on in Australia at the time. Many of the boards were in the low six foot range and below. We were totally on board with the small boards, but were finding that their range of versatility was lacking. We were interested in riding very short boards but realized that the boards needed more drive and stability than what the existing twin and single fins provided. Long story short; in 1970 – Duncan, my father, and I did some brainstorming and came up with the 3 Fin Bonzer in December of that year. It incorporated two long keel shaped side fins placed forward of an eight inch center fin. The deep center fin was due to the wide tail of this template. The initial testing proved to be a revelation and our mission had begun.

TA: How do the performance aspects of a Bonzer 5 and Bonzer 3 differ? On the other hand, are there important similarities that cross-over between them?

MC: There are different performance characteristics between the 3 and 5 fin Bonzer fin systems, but it is not a simple case of one being superior to the other. The hydrodynamic principal is the same for each. Therefor the speed, drive, edge control, rail to rail transition and maneuverability are present in both the 3 and 5 fin setups. The differences present themselves in various ways depending on what template they are utilized on. It is a bit tedious to go through, but basically the five fin employs more fin area closer to the rail further up on the board. This provides a bit more hold and edge control in deep critical areas of the wave. Depending on the width of the tail this aspect will be more or less apparent. To be honest we haven’t done a one to one comparison on each of our models. A couple of years ago I shaped Taylor Knox identical (as much as possible) 5’11’’ Wi 5 models, one 3 fin and one 5 fin version. Taylor has been riding Bonzer 5’s periodically for 23 years. He knows them well. This was his first experience riding a Bonzer 3 shaped the same as his Bonzer 5’s. He really enjoyed giving the 3 fin a go. The two things he liked most were the high lines he could draw through critical sections backside and the drive he could initiate coming down the face after carving off the top. This was the case both frontside and backside. In final analysis though, he said that if he were to ride one in a contest he would choose the 5 fin. The Bonzer 5 is a bit quicker off the mark and just suits the modern shortboard style of surfing for this type of template shape. Over the years we have created a general pairing of the 3 and 5 fin systems with particular shapes in our range of boards, but this does not preclude mixing and matching according to a customer’s wish.

TA: Do you have a formula for people to use when sizing a center fin for their Bonzer?

MC: As a general rule we recommend larger fins for wider tailed and longer boards. ‘General’ is the operative word though; because the size of the person as well as their personal preference also has a barring on center fin size. Sometimes a bit of experimentation is in order to arrive at the optimum combination.


TA:
 We are all huge fans of your curated music selection. Is there any specific genre that gets you excited to shape and surf? What other forms of art are you inspired by?

MC: The curated music within the Bonzer online universe is provided by my son Jacob. He has a deep awareness of musical roots and he keeps dear ole dad and uncle Duncan up to date as to what shines these days. Jacob has also picked up the Bonzer shaping mantel and is keeping us on our toes there as well. Visual art, photography, film, literature, philosophy and music have all played a part in making us who we are. Music was the predominant driving force for us in the early Bonzer years. The Kinks, Capitan Beefheart, Lou Reed, David Bowie, John Cale, Brian Eno and Roxy Music, to name a few, gave us energy
and inspiration to push ahead as outsiders in the surfboard design world.
We have been asked what we attribute the Bonzer’s longevity too? Plain and simple, they work really freaking well. Bonzer is Australian slang for extra ordinary or unique. Our 52 year Bonzer Experience has been nothing short of that.

Posted on 2 Comments

How to Choose the Right Skateboard Wheels

Simply put, the skateboard wheels are the part of your skateboard that allows you to move, and help determine how fast you can go. Typically made of polyurethane, skateboard wheels come in a range of sizes, colors, and durability levels to suit your skateboard style and preference.

Skateboard wheels are measured by both diameter and durometer. Diameter is the size of the wheel, and durometer is the hardness of the wheel. Both of these factors are a matter of personal preference, and what you intend to do on your skateboard. Custom building allows you to choose what the best wheels are to match your deck, trucks, and hardware.


Choosing skateboard wheel diameter

Choosing skateboard wheel size

Skateboard wheel diameter is measured in millimeters (mm). The lower the number, the smaller the wheel. Most wheels range from 50-75 mm. Smaller wheels result in a slower ride, and larger wheels result in a faster one. Wheel diameter also affects how quickly you accelerate and how tightly you can turn.

If you are doing technical tricks on a shortboard, smaller wheels are a natural choice. For cruisers and longboards, larger wheels give you the speed and balance you will need. Additionally, your height and weight can affect what size wheels feels right for you.

50-53mm Small, slower wheels; stable for trick riding and smaller riders skating street, skate parks, and bowls.
54-59mm Average wheel size for beginners and bigger riders skating street, skate parks, bowls, and vert ramps.
60mm + Specialty riders skating longboards, old-school boards, downhill, and dirt boards; made for speed and rougher surfaces.

Skateboard Wheels Diameter


Choosing skateboard wheel durometer

Durometer measures the skateboard wheel’s hardness. Most manufacturers use the Durometer A Scale, which is a 100-point scale that quantifies how hard a wheel is. The higher the number, the harder the wheel. The average wheel durometer is 99a. Certain manufacturers may use the B Scale, which measures 20 points lower and allows the scale an extra 20 points for harder wheels. For example, an 80b durometer is the same hardness as a 100a durometer. Such skateboard wheels have a wider and more accurate hardness range.

Generally speaking, harder wheels are faster, and softer wheels are slower but offer more grip. Softer wheels are better suited to street skating; harder wheels are better for smooth surfaces, such as skate parks. Some companies even specially design their wheels for a specific use.

Here are some general guidelines for wheel durometer.

Skateboard Wheel Durometer

78a-87a Soft wheel good for rough surfaces, longboards, or street boards that need lots of grip to easily roll over cracks and pebbles. Designed for smooth rides, cruising, longboards, hills, and rough surfaces.
88a-95a Slightly harder and faster with a little less grip, but the grip’s still good. Good for street and rough surfaces.
96a-99a Nice speed and grip– an all-around good wheel. Great for beginners skating street, skate parks, ramps,pools, and other smooth surfaces.
101a + Hardest and fastest wheel with the least grip. Ineffective on slick and rough surfaces. These are pro wheels.
83b-84b Wheels using the B scale are extremely hard, measuring 20 points lower than the the A Scale in order to allow the scale to extend another 20 points for harder wheels.

Skateboard Wheels at Warehouse Skateboards

Choosing contact patch

Contact patch is an important feature of skateboard wheel performance. A wheel’s contact patch refers to the area of the wheel that actually makes contact with the pavement. If you have large longboard wheels, your contact patch will also be large.

So why is contact patch important? If you have a large contact patch, your weight will be distributed over a larger area. This reduces the compression of the urethane in your wheels and decreases rolling resistance, which can slow down your wheel.

Wheel shape affects the size of your contact patch as well. Rounded wheels make less contact with the pavement, while square wheels make maximum contact with the pavement. The placement of contact patches can also affect wheel performance.

Posted on

SIZING YOUR STAND UP PADDLE

Sizing Your Stand Up Paddle

There is a lot to consider when choosing the correct paddle length. The reason we give a range of paddle lengths for each stand up activity is because of the differences in paddling postures, paddling techniques, board styles and water conditions. Use this chart as a starting point.

Race:               Add 4″ – 10″ to your height

Surf:                Add 4″ – 8″ to your height

Whitewater:    Add 4″ – 8″ to your height

All Water:        Add 6″ – 10″ to your height

Take into the consideration the following:

  1. The majority of paddlers will fit in the middle of the range.
  2. If you have broader than average shoulders or longer arms, go to the high end of the range.
  3. If you paddle with a more upright style of paddling, go to the high end of the range.
  4. If you paddle with a more bent over style of paddling, go to the low end of the range.
  5. If you have shoulder or elbow problems, go to the low end of the range.
  6. These are general guidelines so please take into account your personal preferences and proper biomechanics for paddling.
Posted on

CHOOSING A STAND UP PADDLE

Choosing a Stand Up Paddle

1. ACTIVITY: Are you racer, surfer, whitewater or a versatile all water paddler? Start by choosing an activity to narrow your choices.

RACE:  If competition is your thing, then you need a light paddle with the right amount of power. Choose one of our paddles designed specifically for racing. Each of our Race paddles is optimized for straight ahead paddling.

SURF:  If you need a paddle that will be strong enough for the dynamic ocean environment, then you should choose a paddle in our Surf Series. Our Surf paddles feature a symmetrical blade for easy skimming and rounded blade edges that protect your board.

WHITEWATER: If you find your fun in running rapids and surfing standing waves, then your paddle needs to be bombproof and durable enough for the demands of the river.

ALL WATER: If you want a paddle that performs well in a variety fo environments, or will be used by family and friends, then an All Water paddle if for you. All Water paddles are designed to be versatile in their use but not excel at any one specific activity within stand up paddling.


2. BLADE SIZE: Choose a blade size to meet your specific power needs.

SMALL BLADES (80 sq. in. – 87 sq. in.) are best suited for smaller paddlers, those who prefer a quick cadence, or if you suffer from joint pain of overuse injuries.

LARGE BLADES (91 sq. in. – 100 sq. in) are best suited to larger, stronger paddlers or beginner paddlers looking for stability.

WOMEN & KIDS BLADES KIALOA offers paddles specifically for Women and Kids with smaller blades and Slim Shafts.


3. FIXED or ADJUSTABLE LENGTH: There is a lot to consider when choosing the correct paddle length.  The reason we give a range fo paddle lengths for each stand up activity is because of the differences in paddling postures, paddling techniques, board styles and water conditions.

FIXED LENGTH: 

RACE: Add 4″ – 10 ” to your height

SURF: Add 4″ – 8″ to your height

WHITEWATER: Add 4″ – 8″ to your height

ALL WATER:  Add 6″ – 10″ to your height

Take into the consideration the following:

  1. The majority of paddlers will fit in the middle of the range.
  2. If you have broader than average shoulders or longer arms, go to the high end of the range.
  3. If you paddle with a more upright style of paddling, go to the high end of the range.
  4. If you paddle with a more bent over style of paddling, go to the low end of the range.
  5. If you have shoulder or elbow problems, go to the low end of the range.
  6. These are general guidelines so please take into account your personal preferences and proper biomechanics for paddling.


ADJUSTABLE LENGTH: If you plan on sharing your paddle with family and friends you would choose one of our paddles that adjust in length with 16″ of adjustablility. You will find this optionon our value oriented paddles featuring the 16″ Utili-T™ or the 16″ Utility Palm™. If you are looking for a personal paddle that will allow you to make length changes on the fly, choose a paddle with our 6″ Pro-T™ or 6″ Utili-T™ which can be found on our performance oriented paddles.

16″ of ADJUSTMENT: I will share my paddle with family and friends.

6″ of ADJUSTMENT: I want a personal paddle that offers 6″ of adjustment.

TRAVEL: I will be traveling with my paddle and need it to break down.


4. BLADE TECHNOLOGY: Choose blade technology to meet your performance and durability needs.

CARBON FOAM CORE blades allow us to make complex shapes in a stiff, lightweight and strong blade. The PowerARC™  and PowerHook™ profiles facilitate a good catchand the smooth back face allows for an esy release. Internal Carbon edgebanding provides excellent durability to the edge of the blades. Each of the Carbon Foam Core blades is handmade in the USA.

FIBRLITE™ technology has ceated a paddle balde with the industries best strength to weight ratio. The durablility and impact resitance of these blades is unmatched while offering a light weight, stiff and high performance feel. Utalizing post manufacturing industrial waste these are the first high performance blades using recycled material. Fibrlite™ is a material made of continuous long-strand carbon fiber or fiberglass. Through a propietory manufacturing process, the carbon of fiberglass is impregnated with a polypropylene resin, bonding the fibers together.

NYLON REINFORCED FIBERGLASS injection molded blades provide value pricing in a durable and rigid blade.

Posted on

CORRECT METHOD TO CUT A SUP PADDLE

How to Cut Shafts and Glue T-tops on SUP Paddles

Sizing: Determine the size of your paddle by adding 6″-10″ to your overall height. If you paddle more frequently in the Surf, lean towards the shorter end of the range for quicker maneuverability on the waves. For flar water paddling go longer since you will likely be standing straighter.

Cut the paddle to the desired height. For carbon shafts use a sharp hack saw or power saw. For aluminum shafts a hack saw is fine. Make sure it’s an even cut to allow the T-top to lay flat


adjusting_sup_paddles_1

Lightly sand the outside of the shaft where it will be inserted into the T-top. This creates texture to which the glue will adhere

adjusting_sup_paddles_2

Use regular setting 2 part epoxy glue. Make sure to use an adequate amount of glue to ensure a watertight seal. Failure to do so will cause water to leak into the shaft. Please let glue completely dry for 24 hours before use

adjusting_sup_paddles_3

IMPORTANT! How to orient the T-top….. Place the flat part of the T-top facing the font of of the blade. The top should fit into your fingers when you grip it. Once the T-top is placed into this position sight down the shaft to ensure the T-top is parallel to the blade

adjusting_sup_paddles_4

Excess glue should seep out from where the T-top meets the shaft. Clean excess glue from around the seal with a paper towel. An even amount of glue seeping out is a good indication of a good seal.

Set the paddle upside down, secure it so it won’t fall and let it dry overnite. This helps the seal around the T-top rather than dripping down the shaft.

Go paddle and HAVE FUN!

Posted on

THE RIGHT SURFBOARD LEASH

Having worked in a Surf Shop for many years, these are very familiar questions.

Why do I need a leash?What size leash should I get?
What is the difference between all these leashes?
How thick should my leash be?How do I attach it to my board?

The modern surfboard leash was developed in California in the early 1970’s. The first leashes were made of surgical tubing with a suction cup that was placed on the nose and a strap placed on your wrist. We figured out pretty quickly that this really wasn’t the best idea (it’s pretty hard to paddle with a leash attached to your wrist)!

Next came the bungie cord with a leather strap that attached to your ankle. This worked out much better, except that when you lost your board and the cord stretched out, the board came rocketing back at you, warp speed!

The modern leash is a greatly advanced device, a solid urethane cord, attached to a padded cuff and railsaver with swivels to prevent tangling.Leashes help keep you attached to your surfboard. Your leash allows you to fall on a wave, or bail your board when you’re in a difficult position in the impact zone. After you surface, you are then able to recover your board and get back out into the line-up. Without a leash you’re forced to swim and retrieve your board wherever it ends up. Most times, your board ends up on the beach or on the rocks. Besides the inconvenience of having to swim for your board, and the loss of time when you could be riding waves, losing your board can also be dangerous to other swimmers and surfers.

Leashes are NOT a safety device! They were designed for convenience…… words of warning……. You are in the Ocean, there is no substitute for good swimming ability. If you look at the waves and don’t feel confident to swim alone without your surfboard, DON’T GO OUT!

Another good reason to use a leash – Performance. In almost all conditions, falling off your board or losing your board is a pretty common part of any session. Your leash allows for quick recovery of your board. The quicker you get back on your board, the quicker you get back out and get another wave.Reefs are also a pretty good reason to wear a leash. Reefs are often very shallow, very sharp and dangerous. Often, the only thing that separates your flesh from razor sharp reef is your board. You really don’t want to lose your board under these circumstances. Not only will you get all torn up, but expect the same or worse for your board.

OK, you realize the value of a leash. How do you grab the right one for you? The basic formula to stick to, is to make sure that the leash is at least the length of your board. The less experience you have, the longer your leash should be. If you’re riding a 7 foot board and still learning to control it, then make sure your leash is at least a foot longer then your board. Keep in mind that most leashes are really about 6 inches longer then the sizes listed, because the manufacturers only count the length of the actual cord, not including the railsaver and strap. Be sure to ask the Staff at the Shop about the features, length and thickness before you buy. We’ve probably sold a Zillion leashes and hopefully have the right answers for your questions.

Some more thoughts on leashes:Thickness translates to strength. “Comp” leashes (competition) are very thin. This means less drag, and also much less strength. If you aren’t sure…… go stronger.Swivels are there to keep the leash from tangling. Check them out. There are hi-performance swivels and very basic swivels. Choose the best leash your can afford.Cuffs are “key”. Look at the cuff. How easy is it to get into and out of? How durable and comfortable is it? Most cuffs also contain a key pocket to keep your key with you!Rail-savers are also worth a look. Is the rail-saver detachable? How long and thick is it? The bigger and heavier duty the rail-saver is, the stronger, but also creates more drag.One more thing to remember! Now that you have a good leash, remember that when you wipe out, your board will be really close to you when you surface. Always come up to the surface with your arms or hands in front of your face. That will greatly reduce the chances that your board could hit you in the face!

One last thing……. Be responsible! If you let go of your board you’re endangering everyone else around you. You must do your best to control your equipment. Always try your best to hold on to your board. If you just let go of your board, it very likely could hit someone else and possibly injure them.Go Surfing and Have Fun!!!!

Posted on

THE TRUTH ABOUT SURF WAX

Today’s Surf Wax is a high tech version of the old candles and paraffin that was originally used on surfboards for traction starting in the 1940’s. Today’s wax is formulated to work in specific temperatures. Wax that has been made for colder water is much softer and stickier than wax made for warm water.When you travel from the colder climes to warmer (or vice-versa), you’ll find that the wax that you have on your board will very likely not perform very well on your board.

Being from New Jersey, we likely will use just about every wax type during our surf year. From January to about Mid-April, Cold water wax is definitely the rule. Beginning in April and usually lasting to about July we use Cool wax. Finally in July, the water warms enough to use warm water wax and we continue with warm usually through September. October returns us to Cool wax and by late November we’re back to Cold. Whew!When you get a new board the best waxing technique is: Put a heavy coat of base wax (tropical works just as well), up to ½ a bar, criss-crossing the wax to create beads. Then apply the appropriate temperature wax over the base. You’ll find that you’ll get better and more durable beading (bumps and beads help create traction). The wax will be more tacky and durable because of the base coat.

Epoxy Surfboards – If you own an epoxy board you’ll find that cool wax doesn’t readily stick to your board. You must first put the base wax (or tropical) down before you apply the cool. This dramatically improves the life of your wax job, and also gives you the tackiness you’re hoping for.Be sure to always keep a wax comb or scraper with you. This way you can rough up your wax if it feels too loaded up on your deck. If you encounter different temperatures you can also scrape off the wax and apply the right type.

In summary, the tip of the day is: Experiment! Wax is the best priced product in any surf shop. Buy a couple different formulas or companies. Try starting out with a good hard base on the board, and then adding softer waxes to the top.Wax is a very personal and artistic part of the surfing experience. Pay attention to the brands you like and your temperature formulas. It may mean the difference in competition, making that critical section, or getting the barrel of your life!


Posted on

UNDERSTANDING WETSUIT DESIGN

In the 1950’s Jack O’Neill was a surfer in Santa Cruz, California. In Central California the water temps rarely get above 60, and in the winter is often in the 40’s. Jack wanted to spend more time in the water and began to experiment with crude neoprene rubber. His early research has led to the high tech wetsuit designs of today.

Wetsuits are a product that we, as surfers, use to keep ourselves warm in the water. The wetsuit is constructed of neoprene (in most cases) and consists of various different construction types and styles. Whilst this article is designed to be fairly comprehensive we have tried to create it with a beginner surfer in mind.

Wetsuit Thickness

Wetsuits are categorized by thickness from 0.5mm right up to 7mm. The measurement refers to the thickness of the neoprene which represents a higher or lower degree insulation depending on the water temperature.


Some wetsuit manufacturers will mix the measurements with a thicker measurement on the torso and thinner on arms and or legs to provide a double measurement. An example of this would be a 3/2, this would represent 3mm on the torso and 2mm on the arms and legs.

Wetsuit Styles

Full Suit : Represents neoprene covering the whole body. Some thicker full suits might have an integrated hood to insulate the head. This style of suit would be more suitable for more frigid water temperatures.

Rip Curl Dawn Patrol 3/2 - Eastern Lines Surf Shop

Spring Suit / Shorty : The Shorty or Spring Suit incorporates neoprene to the just above the knee and can either have neoprene covering the whole arm finishing at the wrist or half the arm finishing just above the elbow. This style of wetsuit would most applicable in water temperature less frigid than a Full Suit.

O'Neill Hammer SS Spring

Farmer John: The Farmer John features neoprene covering the whole leg and with a shortened sleeve covering that finishes at the shoulder. This style of wetsuit would be best suited to less frigid water temperatures.

Short John: The Short John features neoprene covering to the shoulder and to just above the knee. This style of wetsuit would be more applicable to warm water.

Vests & Shorts : For warmer waters it is possible to obtain shorts and vests made made of thin neoprene that provide either a slight amount of heat insulation or geared more to UV and rash protection.


Wetsuit Stitching

Wetsuits are made from different ‘body shaped’ pieces of neoprene that can be of varying thicknesses, materials and shapes. These pieces need to be put together and there are varying different methods. Here are the most common.

Blind Stitching: This the most widely used method of joining panels in the industry as it results in no exterior needle holes. The two pieces of neoprene are placed next to each other and a sewing machine with a special curved needle penetrates just deep enough into the materiel to get a fix but not create a hole all the way through. This makes for a incredibly strong and waterproof join.

Tape: In the early days of wetsuits, before blindstitching, the joining process would make holes through the neoprene. This created two clear problems, the first was a degradation in the strength of the suit as a whole and the second was to allow a lot more (cold) water to penetrate, thus compromising the suits warmth considerably. Eventually tape was introduced, which was made out of neoprene cloth that was either heat welded or glued over the stitching holes thus helping to make the suit more effective as regards to the previous points.

Glue: Around the same time that taping seems became an industry standard it was found that glue could be used to replace stitching. Glue on its own, however was found to be less durable and normally is accompanied by tape.

Overlock : This is a type of seam that creates a seamless effect on the outside yet has quite a lot of material left on the inside, which is where the seam is stitched. More uncomfortable but more waterproof. Normally taping would be applied to the inside seam.

Flatlock : This type of seam is weaker and less waterproof, it is the basic seam which involves material edges being placed next to each other and stitched in parallel. The strength and waterproof issues can be combated using glue and tape. This seam is more comfortable than the Overlock option.

Acceessories

Gloves: Covering of your extremities is important and can sometimes be imperative. Wetsuit gloves can be attained for this purpose and, similar to wetsuits, can be graded in different thicknesses depending on water temperature.

It is possible to purchase webbed gloves which may improve paddling while the general standard is the generic five finger gloves.

Rip Curl F-Bomb 5mm Glove-1540

Boots/Booties: Standard Boots are footwear made from neoprene and are made to insulate the feet. Boots or booties can come in a varying thickness as with the suits themselves and generally feature a sole for greater traction. Reef booties are generally used for purposes of protecting your feet against reef or rocks. These tend to be thin and have a thick sole. Both types of boots and booties can come as full feet boots or split toe. The split toe model accommodates the big toe in a separate compartment to the rest of the toes. This is said to improve balance and warmth. Wetsuit socks are generally worn underneath fins or flippers to insulate feet. They will have no sole and come in varying thicknesses as with boots.

O'Neill 7mm Boot - Eastern Lines Surf Shop

Hood: The Hood is a necessity in colder waters and helps to insulate the head from frigid waters and wind. They can come integrated into your wetsuit, attached to a thermal vest or acquired separately. Hoods can feature a built in visor to shade your eye from the sun.

Construction

Neoprene : All wetsuits are made from chemically treated neoprene and while there are many different manufacturers that incorporate more environmentally conscious treatments, the neoprene remains a constant in wetsuit construction.

Features and Characteristics

Getting into a wetsuit can be a struggle the first time you do it, this is generally because the wetsuit is dry (brand new) and wants to suck the water from your skin, and coupled with a heated shop you are looking at a struggle. Don’t despair though as this process will only get easier the more you use your suit.

Entry systems: There are three main styles of entry system, it is more of a personal preference which you use while there are some clear benefits to each. The full back zip and the ¾ back zip are with out doubt easier to get on and off while the evermore popular chest zip provides greater flexibility and warmth.

Key Loop / Pocket: A low tech feature which allows a key to be attached to either the inside of a designated zip pocket or concealed place on the suit.

Titanium Mesh Panels: In early cold water wetsuits, this featured very heavily as the panels are said to increase warmth and keep out frigid air in windy conditions. The drawback is that this are a far less flexible material and can have integrity issues along the seams.

Understanding the Jargon

Most of the world’s wetsuits are produced in the same group of factories across China and Taiwan using similar fabrics and cuts. Some manufacturers focus on warmth, some on flex and some on longevity. It is important to note that while you will be bamboozled with features and terms, those three things are what is important.

As regards to the fit of a suit, all the manufacturers are slightly different as are all bodies. After trying a few of the manufacturers you will learn which make suits closest to your body type.

Posted on

COLD WATER SURFING ESSENTIALS

Cold water Surfing is a reality for those of us living in the Northeast. We get a break late in the Summer when the water temps often reach into the 70’s. But we all wear a wetsuit most of the year. Many Surfers turn in their boards for snowboards or skis once those cold windy days start. Unfortunately they are missing often the best surf of the year!

Wetsuit technology has changed drastically in recent years, producing lighter, warmer wetsuits than ever before! Often while sitting in the line-up I often feel overheated and sweaty. That’s how warm they are! With the new equipment, Surfing for a couple of hours at a time is easy. By doing a little pre-planning you can make your Winter surfing experience a lot more enjoyable.

Picking a Wetsuit

The primary concern of most Surfers when shopping for a wetsuit is price. This is a huge mistake! Buying a suit for the Spring and Fall you can get away with a less expensive suit because the water is warmer. But in the Winter, the conditions are serious. Having the absolutely best gear you can afford is essential. To surf all Winter a hooded 5/4 is the only way to go. The wetsuit companies realize that they need to offer a mid-priced suit, so today 5mm suits can range from about $300 to $500. The difference in the suits is the quality of the rubber and the seams and taping. The warmest most flexible rubber with the best seams and taping are the way to go.

If your budget keeps you in the lesser expensive suits don’t fret…… you’ll still be able to get in the water, just more likely not as long as those in the full on gear. As always when buying a suit, try on suits from several manufacturers. We only sell the best brand name suits so quality is not an issue. The suit that fits and feels the best is the suit to buy.

If you are planning on surfing on all the best, coldest days be sure to buy 7mm boots and 7mm mittens. While the 3 finger and 5 finger gloves give you a bit more feeling with your board, you can survive much longer with the mittens

Thicker boots and gloves are more difficult to get on then their thinner brothers. A new product, called wetsox goes over your feet and your boots will never give you trouble again. Another method is to take a small amount of mixed water and dish soap and rub some just along the tops of your boots and gloves. Be sure not to get them inside or you’ll spend you session with your hands and feet sliding all over the place!

.

Tips to make your Cold Water Surfing more fun!

  • Always keep your suit in a warm dry place
  • Get all your gear together the night before. There’s nothing worse than getting to the beach and be missing a glove!
  • Put your suit on in the warmth of your house.
  • I suggest waxing your board in the house before you leave. Putting on cold wax on a cold board is no fun at all
  • Always have an extra surf leash in your car
  • Bring a couple of gallons of warm water with you. It’s great to pour that warm water all over you after you get out of the water
  • I suggest never taking your suit off outside at the beach.
  • Put a heavy towel on your seat and on the floor and leave your suit on until you get home.
  • I always ride home with my suit and get in that nice hot shower. Getting your suit off in the shower is a lot more fun!
  • After removing your suit carefully rinse it off, then turn it completely inside out and rinse it completely.
  • Do not hang your suit by the shoulders to dry. Instead hang it over a bar or across a hanger and place it somewhere warm to dry.

Surfing in the Winter can be challenging, but the rewards are well worth it. Uncrowded days and great Surf are to be had, don’t miss those days!